Feeds:
Posts
Comments

Archive for August, 2011

Camp Cooking

Wow! It has been WEEKS since I last posted anything! I apologize for dropping the ball. Luckily, summer is almost over which means our lives will be slowing down a bit (Actually, that’s a total lie. I’m pretty sure things will never slow down. Life in the fast lane baby!)

We will be leaving EARLY Thursday morning to make a 10 hour journey to Delaware, Ohio. We will be meeting friends from NY at a state park and spending labor day weekend (through Tuesday) together…because we all know that no one should be alone on labor day (Haha, I hope Kim is laughing right now).

To prepare for this 5 day long rustic retreat I decided to assemble and freeze our camp meals before leaving, then I will cook them in our awesome new Lodge dutch oven. This way we won’t have to buy a bunch of food once we get there and we won’t have to lug a bunch of food with us in our already overpacked car.

I was totally inspired to make and freeze our meals after reading an absolutely GENIUS blog post about make-ahead slow cooker meals. You can read it for yourself here:

Freezer Cooking With Slow Cooker Recipes (it seriously blew my mind…this woman should win an award…seriously)

So, I put together 3 meals: plus, I’m marinading a pound of chicken spiedies that I will freeze tomorrow. We will be consuming: Turkey Chili, Vegetarian Southwest Stew, and Tacos (the theme of these meals: cumin…and lots of it).

Here are the (incredibly simple) recipes for these homemade frozen meals:

Turkey Chili: (makes 4-6 servings)

-1/2 a pound of lean turkey meat

-1 green bell pepper: chopped

-1/2 of a large yellow onion: finely chopped

-3 cloves of garlic: minced

-1 15oz can of kidney beans: rinsed and drained

-1 28oz can of crushed tomatoes

-1 packet of chili seasoning OR 1tsp garlic powder, 1 tsp cumin and 1 tbs chili powder

big bag full of uncooked chili. how exotic.


Chili Bag!

Add ingredients to a gallon-sized zip top freezer bag. Freeze. When you’re ready to cook it, empty frozen contents into a slow cooker or dutch oven and add about a cup of water (I’ll be using a cast iron dutch oven over a bed of coals). In the slow cooker: cook for 4 hours on high OR 8 hours on low. In a dutch oven: cook for an hour, give everything a stir, then cook for an additional hour if needed. I like my chili to simmer for several hours so I’m going to do my best to keep my coals at an even, low temperature (and plan on cooking my chili for about 3 hours).

Southwest Stew: (makes 4-6 servings)

-1 cup of frozen (or fresh) corn kernels

-1 jar of salsa

-1/2 of a yellow onion: finely chopped

-1 large sweet potato: peeled and chopped into 1 inch chunks

-1 15oz can of chickpeas: rinsed and drained

-1 tbs of cumin (I LOVE cumin…so I add a lot…but if you have a more reserved palate try adding only 1 tsp of cumin at first. You can always add more later if you’d like)

mmm...bag o' stew

by laying the bags flat in the freezer they won't take up as much room

Add your ingredients to a gallon-sized zip top bag. Freeze. Once you’re ready to cook, add the frozen contents to you slow cooker/dutch oven. Add 1 cup of water and 1 tbs of olive oil. If using a slow cooker: cook on low for 8 hours, of high for 4 hours (until the sweet potatoes are tender). If you’re using a dutch oven: cook over medium-high heat for an hour (or until sweet potatoes are tender). Serve with fresh corn bread muffins! Yum!

Tacos: (makes 4 servings)

-1/2 a pound of lean turkey meat

-1 15oz can of black beans: rinsed and drained

-1 packet of taco seasoning OR a combination of garlic powder, cumin, chili powder, salt and pepper (because I totally forgot to buy taco seasoning).

Toss ingredients together in a half-gallon sized freezer bag. Freeze. When you’re ready to cook, add frozen contents to a skillet/slow cooker/dutch oven, add about 2 tbs of water and cook (covered) until the meat is done. Serve with warmed tortillas and all your favorite fixins’.

Read Full Post »

(are you drooling yet?)

I have been craving peaches like nobody’s business lately. It seems like every time I walk past the produce section of a market, all I can smell are peaches. It’s heavenly.

Since we’re housing out of town guests for the week, I decided that a tasty “peachy” dessert was an absolute necessity for this week’s menu. At first, I was toying with the idea of baking a peach pie..but then I realized that I don’t like peach pie (and what fun is baking something that you, yourself, don’t like? Answer: No fun at all). Then it hit me, PEACH UPSIDE DOWN CAKE (and yes, I did in fact YELL that in the middle of the grocery store while looking at peaches…like a crazy person).

There was only one (minor) detail: Not only had I never baked an upside down cake from scratch before; but I had never baked a single cake (of any kind) from scratch before (aside from flourless chocolate cake). Isn’t that just the wildest thing ever! Sure, I’ve baked pies, cookies, breads, and brownies..but never a cake. I’m just not a big cake person. I like it when it’s REALLY good…but I’ve had way too many REALLY bad cakes to call myself a cake fan. Such is life.

After a wave of shame washed over me, I decided that this very serious character flaw needed to be amended…ASAP. So I bought 5 pounds of peaches and went on my merry way.

I adapted this recipe from a Plum Raspberry Upside Down Cake recipe by Martha Stewart (Oh Martha, You’re just so fabulous). The cake, itself, is moist yet crumbly; almost like a scone. It’s very lightly sweetened, yet has a hint of spiciness to it. The peaches and raspberries are absolutely perfect together. In a word: Ah-Mazing!

Needless to say, I was thrilled with the way it turned out. Go me!

Did I mention how ridiculously easy this was to bake? Seriously, I think the most difficult part was slicing the peaches. I’m not even joking.

What You’ll Need:

6 ripe peaches; uniformly slice 4 of the peaches and chop the remaining 2 peaches.

1 and 1/4 sticks of unsalted butter; 8 tablespoons at room temperature and 2 tablespoons melted

1/3 C light brown sugar

half a pint of fresh raspberries

1 1/2 C unbleached all purpose flour

1/4 tsp salt

1/4 tsp baking soda

3/4 tsp baking powder

3/4 C raw cane sugar

3 egg yolks

1/2 c organic sour cream

1 tsp cinnamon

1/4  tsp nutmeg

1 tsp vanilla

Pre heat your oven to 375°. In a greased springform pan, coat the bottom of the pan with 2 tablespoons of melted butter. Sprinkle the brown sugar on top of the melted butter. Place the sliced peaches on top of the brown sugar, in whatever pattern you see fit. I chose a nice spiral pattern. Fit individual raspberries between the cracks of the peaches (spreading them out somewhat evenly). The bottom of your pan should be completely covered with fruit. Set aside.

In a small bowl, combine your flour, salt, cinnamon, nutmeg, baking soda and baking powder. Set aside. In a large bowl, cream together remaining butter and sugar. Add the egg yolks, one at a time, until thoroughly blended. Now, add half of your dry ingredients to the bowl and mix until combined. Add the sour cream and vanilla to the bowl and mix (slowly) until combined. Add the other half of your  dry ingredients. Once the batter is combined, fold the chopped peaches into the batter.

Using a wooden spoon, drop spoonfuls of the batter on top of the peaches and raspberries in your springform pan. Smooth out the surface of the cake before putting it into the oven (unless you want a lumpy bottomed cake…then by all means skip this step). Bake for 60 minutes.

Serve warm or cool. It’s especially tasty with a big ol’ dollop of natural vanilla ice cream. Enjoy!

Makes 12 servings.

Read Full Post »

With my husband away for the week, I am reminded of how easy it is to prepare meals for one person. I feel like I’m a single gal in college again! (with much more financial stability…and a baby)

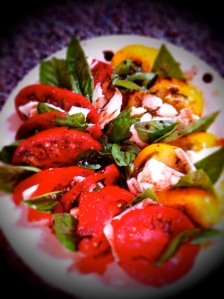
I picked up our CSA bounty last night and was super excited to see a bunch of tomatoes in the bin (along with peppers and squash!..but that’s a different meal). Plus, there was a bag of fresh basil! You know what that means: Caprese Salad!

I think I could eat caprese salad every night of the week during the summer. It’s so clean and bright in flavors.Maybe it’s just me, but I think it helps cool you down when you’re a hot sweaty mess; like I’ve been for 4 weeks straight!

Wanna know what else I love about this salad: it takes 2 minutes to throw together. Literally, 2 minutes.

Slice your tomatoes, slice your fresh mozzarella, strategically place your basil leaves…drizzle with olive oil and balsamic vinegar…a few grinds of salt and pepper…DONE!

I used 3 medium sized tomatoes because I wanted to make a whole meal out of this salad. If you wanted to eat this as a starter to a meal, then 1 tomato would be plenty.

I also used a Balsamic Reduction ala The Pioneer Woman; but you could easily just drizzle balsamic vinegar straight outta the bottle…I know I’m not above doing that. I already had the reduction in the fridge (leftover from Sunday)…so I used it. The End.

**To keep with the casualness (and laziness) of this week’s posts I am going to use only photos that I’ve taken with my new iPhone. Half because I want to test out different camera settings/apps and half because I’m too lazy to bust out the Nikon…yeah yeah yeah yeah yeah**

Read Full Post »

Hello Everyone!

First of all, let me just say that I am beyond excited that The Feel Good Foodie Facebook page is only 12 “likes” away from it’s September 1st goal of 100 “likes”! That is so amazing! Thank you so much to all the fellow foodies (and wannabe foodies) out there who are supporting this journey. I can’t wait to see where we’ll be a year from now! You guys are awesome…so, thank you!

Now let’s get down to the nitty gritty:

My husband is out of town this week for business. This is a big time bummer for JBird and I…but it also means I don’t have to cook. Now, don’t get me wrong, I love cooking with a fiery passion but every good chef needs a break from time to time. I’m currently all out of “thinkin’ juice” and can hardly put a bowl of cereal together correctly these days (Guess who used the expired almond milk on her cereal yesterday? Me! The bigger question is WHY did I not throw away the expired almond milk sooner? I knew it had gone bad…I just couldn’t seem to part with it…serves me right).

I didn’t even go grocery shopping this week. I literally plan on only eating things that we already have in the pantry, fridge or freezer. Which of course means aged cheddar and wheat thins for at least 2 dinners this week…possibly 3. (Actually, not going grocery shopping this week is in response to the obscene amount of money I spent on groceries in July. When we calculated all the receipts up at the end of the month…my jaw hit the floor and I threw up a little in my mouth…it was THAT bad).

This week off from cooking is also in preparation to NEXT week; when we’ll have out of town guests here for the week and I’ll need to be on my A-Game in meal preparations and delicious dinner ideas. The heat is on.

Since I won’t be posting recipes this week I’ve decided to dedicate this week in Feel Good Foodie Land to tips on meal planning, grocery shopping,  sticking to a budget, and maybe a post on all the random things I eat while my husband is out of town (Miso soup and cinnamon shredded wheat = todays lunch!) .

And for your viewing pleasure:

Doesn’t this photo just crack you up?! It’s a corkscrew I found a Target. I think I’m going to have to go back and buy it. Too Funny!

Read Full Post »